How to Create Your Best Booksta Feed

I got asked recently how I created my bookish feed. Before, my booksta theme was really all over the place. I would have a few photos in one sort of style and other photos in a completely different style. It wasn’t really down to planning so much as it was having a consistent theme and filter.
To make my booksta feed I looked at what a lot of other bookish bloggers were doing that I admired, but then I wanted to also add my own style. Aesthetic is important is you’re trying to grow your account, but also so is your own personal touch and unique captions. I think the key to a good bookish feed is to integrate both aesthetic looks and personal charm.
Here are my tips for creating your own aesthetic booksta feed!
Select Your Theme
Have a think about what kind of theme you want. Look through Pinterest and other IG accounts and see what style you want to imitate. I think it’s always good to draw inspiration from people that are doing quite well, then add your own personal twist.
Some examples are:
Brown tones
Vintage
Pink hues
Crisp blue
Dark and moody
Bright and colourful
Have a Photoshoot
The best way to make sure that you have enough content and also have a consistent theme is to do your photos all on the same day. I take all my photos usually on a weekend, and it only taken about an hour to get all the shots.
Here are some shot locations you can try:
Window sill
Bed sheets
Floorboards
Sky shots
Location shots (beach, castles, meadows, mountains, etc.)
Also think about if you want golden tones, take the photos in the afternoon. If you want more shadowy shots, take them in the morning. On a cloudy day you’ll also get softer shots since the clouds acts like a diffuser for the light.
As for cameras, I use my Samsung S9+ for all my photos since the camera is pretty good. You don’t need to use a DSLR if you don’t want to.
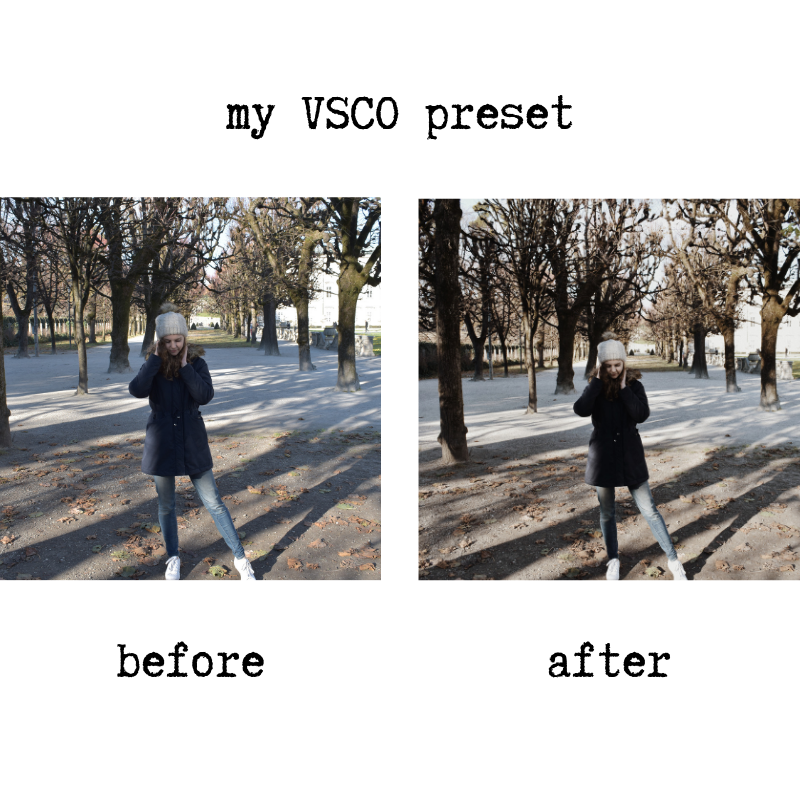
Use VSCO
I resisted buying this for so long but in my opinion, it works the best. I used Snapseed for years but that was why my photos came out so inconsistent — because there wasn’t a blanket filter that you could edit and then apply over everything. On VSCO, you can create a ‘recipe’ which is like your personal preset, to add across all your photos.
Start with one photo from the series that you just took, then play around with the different settings until you find your ‘look’. I would even find a VSCO template setting that you like from someone else, then adjust it to be more you. It makes it way easier then and then you also know what to look for while you’re editing — otherwise it can be pretty overwhelming. Once you’ve got your look save it and apply it over the other photos to see if you like it.
You might need to adjust some of them but overall, it should be a pretty good standard edit that you can use for any occasion! I have one edit that is a bright version of my theme, then one that is more shadowy. This can help you when you have different exposure levels on your pics, or whether they’re indoor/outdoor shots.
Plan Away
I use a planner app and honestly, it’s the easiest way to plan your feed. It’s good because you can take 30 shots, move them around to see what works, then post them when you’re ready. You don’t have to try to imagine what they’ll look like before you post, you know and can adjust where necessary.
I use Preview at the moment but honestly most of the planner apps are really good and free as well. I would plan at least 2 - 3 rows in advance so you can build a consistent theme.
Extra Tip: Shot Types
Planning where and what types of shots you have for your IG can be confusing. My general rule is, 1:2 ratio for location to flat lay shots. I also try to mix up the angles I use and intersperse close ups and long shots. I think if you want to go for a more minimal and cohesive look, then try to spread your heavier shots apart and fill in the gaps with lighter shots. By that I mean, shots with more props/people in them should be further apart.
For inspiration, bookmark your favourite shots from IG and Pinterest and have a go at recreating them yourself. Overtime, you’ll get used to taking high quality shots and it will become like second nature. Like anything, this is a skill that you learn and get better at over time.
I hope these tips help you and encourage you to develop your IG skills! Remember your personal touch on your IG is important — it’s what makes your branding unique! Use your feed to accentuate your uniqueness rather than trying to blend in.
read more writing tips


Editing your first novel is hard. It‘s a difficult process that‘s entirely self-directed, and if you don‘t have a map of how to approach the process, it‘s utterly daunting.